Overview
Kpow supports a wide range of Apache Kafka and Kafka API–compatible platforms, providing robust tools to manage, monitor, and secure data streaming workloads. In this guide, we'll walkthrough how to integrate Bufstream - a cloud-native, Kafka-compatible streaming solution - with Kpow, enabling seamless use of Bufstream's advanced schema management alongside Kpow's comprehensive Kafka management capabilities for an optimized streaming experience.
💡 Visit our earlier posts to learn how to set up Kpow with leading platforms such as Confluent Cloud, Amazon MSK, and Google Cloud Managed Service for Apache Kafka, as well as emerging solutions like Redpanda.
About Factor House
Factor House is a leader in real-time data tooling, empowering engineers with innovative solutions for Apache Kafka® and Apache Flink®.
Our flagship product, Kpow for Apache Kafka, is the market-leading enterprise solution for Kafka management and monitoring.
Explore our live multi-cluster demo environment or grab a free Community license and dive into streaming tech on your laptop with Factor House Local.
Prerequisites
This tutorial uses the Community Edition of Kpow, where the default user has all the necessary permissions for the tasks we will perform.
For users of Kpow Enterprise Edition with user authorization enabled, performing these actions would require the logged-in user to have the SCHEMA_CREATE permission for Role-Based Access Control (RBAC) or have ALLOW_SCHEMA_CREATE=true set for Simple Access Control. You can learn more in the Kpow User Authorization documentation.
Launch Bufstream and Kpow
We begin by creating a dedicated Docker network named factorhouse, which establishes a private communication channel for the Bufstream and Kpow containers. We then launch a single Bufstream broker and Kpow instance in dedicated containers.
Here's an overview of the containers:
- Bufstream (
bufstream)- Image:
bufbuild/bufstream:latest - Host Ports:
9092: Exposes the Kafka API to the host machine.
- Configuration:
- Mode: Runs in
inmemorymode, creating a temporary, single-node broker where all data is lost on shutdown. - Kafka API: Listens for connections internally on port
9092and is also mapped to9092on the host. It advertises itself asbufstream:9092within the Docker network.
- Mode: Runs in
- Network: Attached to the
factorhousenetwork, making it reachable by other containers at the hostnamebufstream.
- Image:
- Kpow (
kpow)- Image:
factorhouse/kpow-ce:latest - Host Ports:
3000: Exposes the Kpow web UI to the host machine, accessible athttp://localhost:3000.
- Configuration:
- ENVIRONMENT_NAME: UI friendly label for this cluster and resources.
- BOOTSTRAP: Configured to connect to the Bufstream broker at
bufstream:9092, using the internal Docker network for communication. - SCHEMA_REGISTRY_NAME: UI friendly label for a schema registry.
- SCHEMA_REGISTRY_URL: Configured to connect to the Confluent-compatible API endpoint of Buf's public demo registry (
https://demo.buf.dev/integrations/confluent/bufstream-demo). For details on connecting to a custom Confluent Schema Registry instance, see the official documentation. - Licensing: The configuration is loaded from an environment file specified by the
$KPOW_LICENSE_FILEshell variable, which is required to run the container.
- Network: Attached to the
factorhousenetwork, which allows it to resolve and connect tobufstream:9092.
- Image:
## Create a docker network to be shared
docker network create factorhouse

## Start a Bufstream broker
docker run -d -p 9092:9092 --name bufstream --network factorhouse \
  -e BUFSTREAM_KAFKA_HOST="0.0.0.0" \
  -e BUFSTREAM_KAFKA_PUBLIC_HOST="bufstream" \
  -e BUFSTREAM_KAFKA_PUBLIC_PORT="9092" \
  bufbuild/bufstream:latest serve --inmemory

## Start a Kpow instance
docker run -d -p 3000:3000 --name kpow --network factorhouse \
  -e ENVIRONMENT_NAME="Bufstream" \
  -e BOOTSTRAP="bufstream:9092" \
  -e SCHEMA_REGISTRY_NAME="Buf Registry" \
  -e SCHEMA_REGISTRY_URL="https://demo.buf.dev/integrations/confluent/bufstream-demo" \
  --env-file=$KPOW_LICENSE_FILE \
  factorhouse/kpow-ce:latest
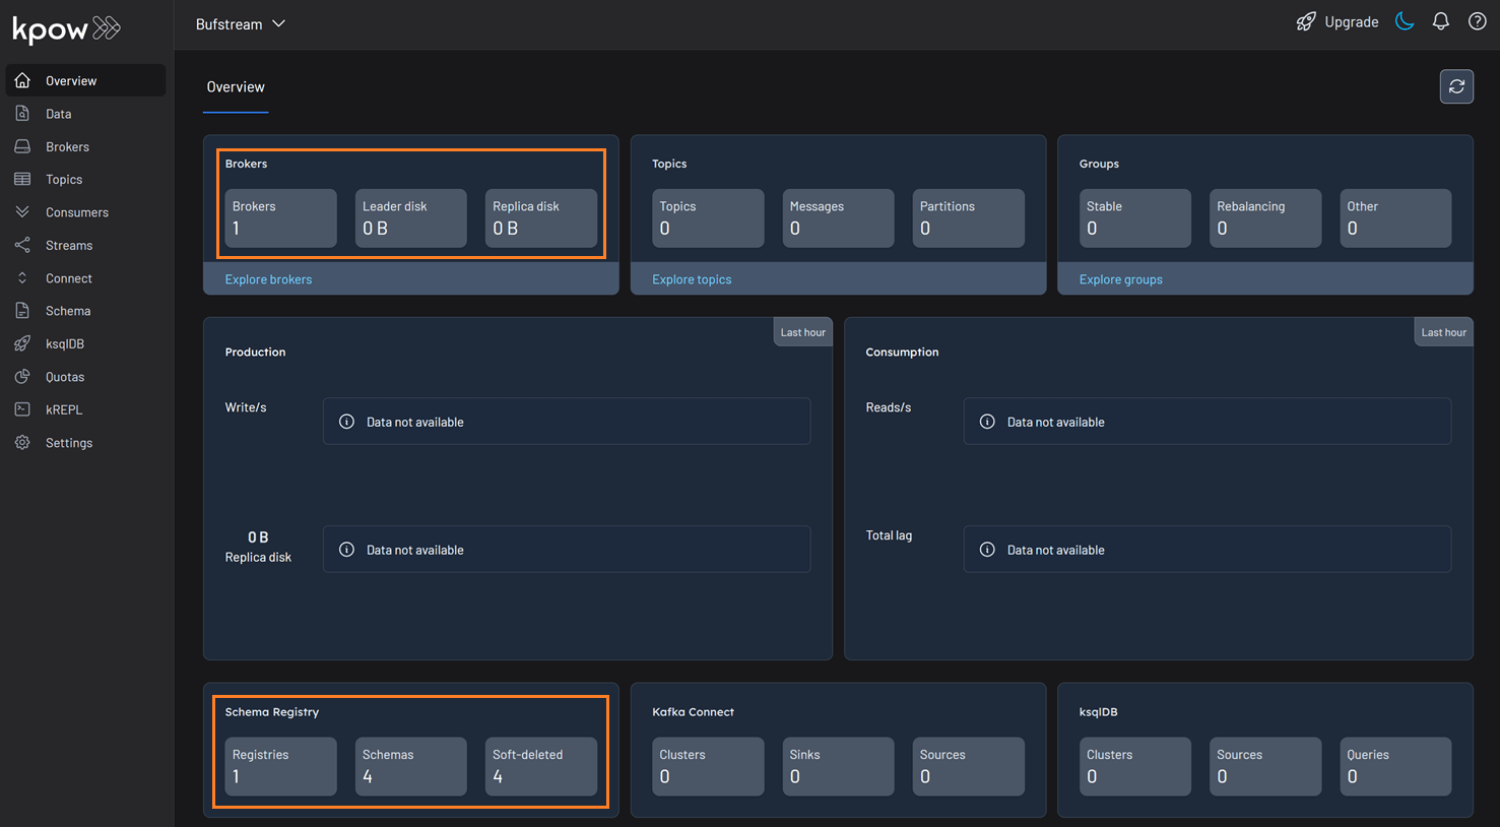
Once the containers are running, navigate to http://localhost:3000 to access the Kpow UI. We will see that Kpow has automatically discovered and connected to the single Bufstream broker and Buf's public demo registry.
Schema Overview
In the Schema menu, we can see that there are four subjects in Buf's demo repository. All of them use the Protobuf format, and for this guide, we will focus on the workflow-dataset-nyc-taxis-value subject.
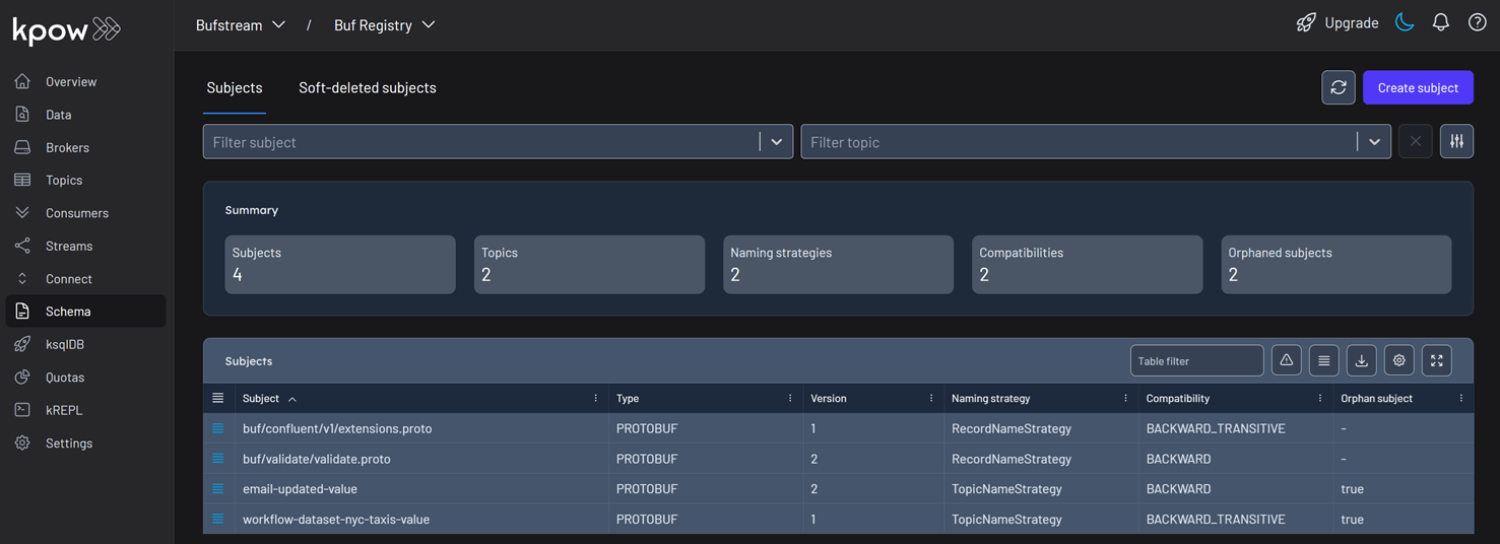
Clicking the menu next to a subject reveals options to view or edit the subject. By selecting View subject, we can examine the subject's schema definition.
The schema uses modern proto3 syntax and defines a detailed structure for a single New York City taxi ride via the main Ride message. It captures a comprehensive range of data, including nested fields for pickup and drop-off events, trip characteristics such as passenger count and distance, and a detailed breakdown of payment components-covering base fare, taxes, tolls, and tips.
// Copyright 2023-2025 Buf Technologies, Inc.
//
// All rights reserved.

syntax = "proto3";

package buf.bufstream.priv.dataset.nyctaxi.v1alpha1;

import "buf/confluent/v1/extensions.proto";
import "google/protobuf/timestamp.proto";

// Ride represents a single tax ride in New York City.
message Ride {
  option (buf.confluent.v1.subject) = {
    instance_name: "bufstream-demo"
    name: "workflow-dataset-nyc-taxis-value"
  };

  // ID of the vendor that provided the ride.
  optional int32 vendor_id = 1;
  // Details about the rider's pickup.
  Event pickup = 2;
  // Details about the rider's drop-off.
  Event drop_off = 3;
  // Other details of the trip.
  TripDetails details = 4;
  // Details of the fare and payment.
  Payment payment_info = 5;
  // Unclear what this is; it's in the Parquet schema though...
  optional string store_and_forward = 6;

  // Event includes properties for an event: time and location.
  message Event {
    // The time of the event.
    google.protobuf.Timestamp time = 1;
    // The location of the event.
    optional int32 location_id = 2;
  }

  // TripDetails describes properties of the trip.
  message TripDetails {
    // The number of passengers riding.
    optional int64 passenger_count = 1;
    // The number of miles travelled.
    optional double distance = 2;
    // The rate code for this trip.
    optional int32 rate_code_id = 3;
  }

  // Payment describes details about the payment and the amount charged.
  message Payment {
    // The type of instrument used for payment.
    optional int64 type = 1;
    // The total amount paid.
    optional double total_amount = 2;
    // Details of the amount charged.
    FareDetails details = 3;
  }
  // FareDetails breaks down all of the components of the amount charged.
  message FareDetails {
    // The fare, based on distance and time.
    optional double base_fare = 1;
    // Any extra fee agreed upon before the ride began.
    optional double extra = 2;
    // MTA taxes.
    optional double mta_tax = 3;
    // Optional tip.
    optional double tip = 4;
    // Fees for using toll bridges and roads.
    optional double tolls = 5;
    // Surcharge that vendor charges.
    optional double improvement_surcharge = 6;
    // Surcharge based on time and location/traffic conditions.
    optional double congestion_surcharge = 7;
    // Surcharge for trips to and from an airport.
    optional double airport_fee = 8;
  }
}
Below is an example JSON record that conforms to the schema:
{
  "vendorId": 2,
  "pickup": {
    "time": "2023-01-01T14:25:15Z",
    "locationId": 138
  },
  "dropOff": {
    "time": "2023-01-01T14:40:30Z",
    "locationId": 236
  },
  "details": {
    "passengerCount": 1,
    "distance": 3.45,
    "rateCodeId": 1
  },
  "paymentInfo": {
    "type": 1,
    "totalAmount": 24.8,
    "details": {
      "baseFare": 17.5,
      "extra": 1.25,
      "mtaTax": 0.5,
      "tip": 3.55,
      "tolls": 0,
      "improvementSurcharge": 0.3,
      "congestionSurcharge": 2.5,
      "airportFee": 0
    }
  },
  "storeAndForward": "N"
}
Working with Protobuf Data
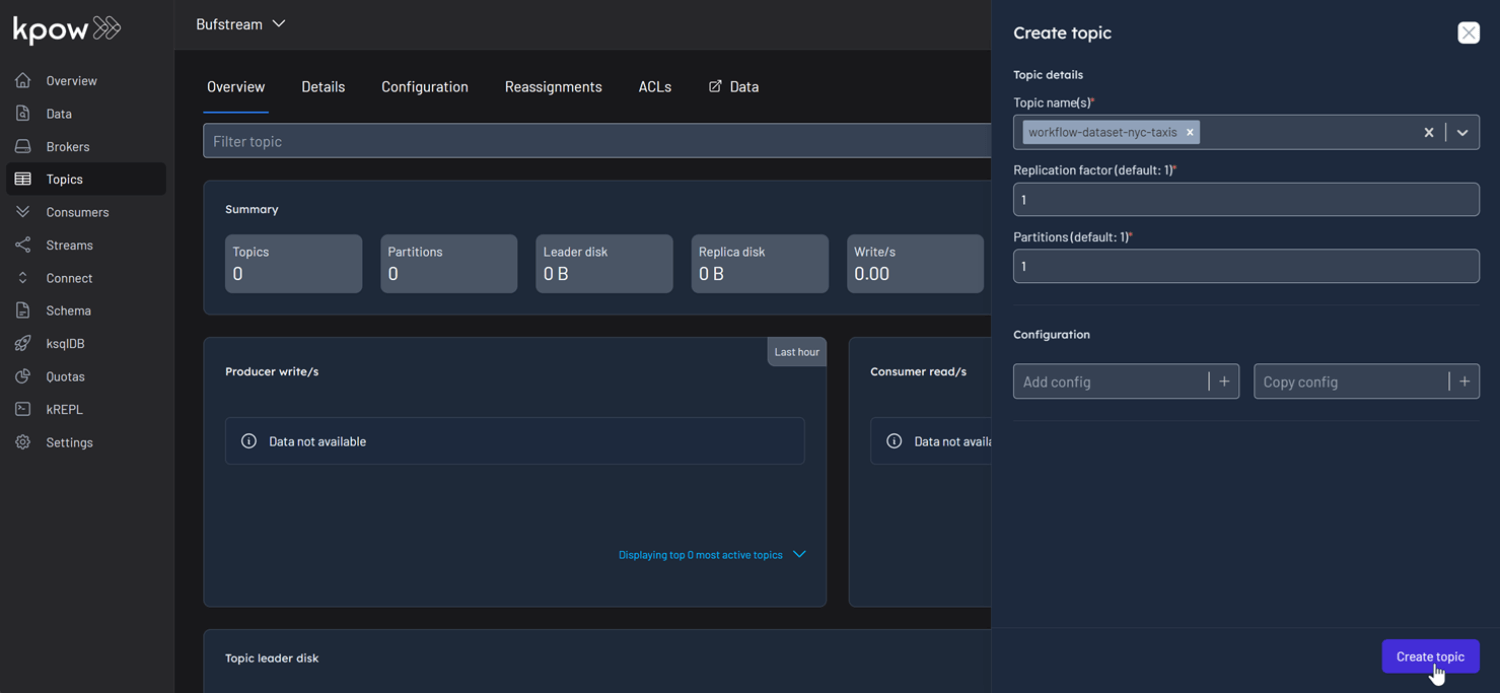
With an understanding of the schema, let's use Kpow to interact with it by producing and consuming a Protobuf message. First, create a new topic named workflow-dataset-nyc-taxis from the Kpow UI.
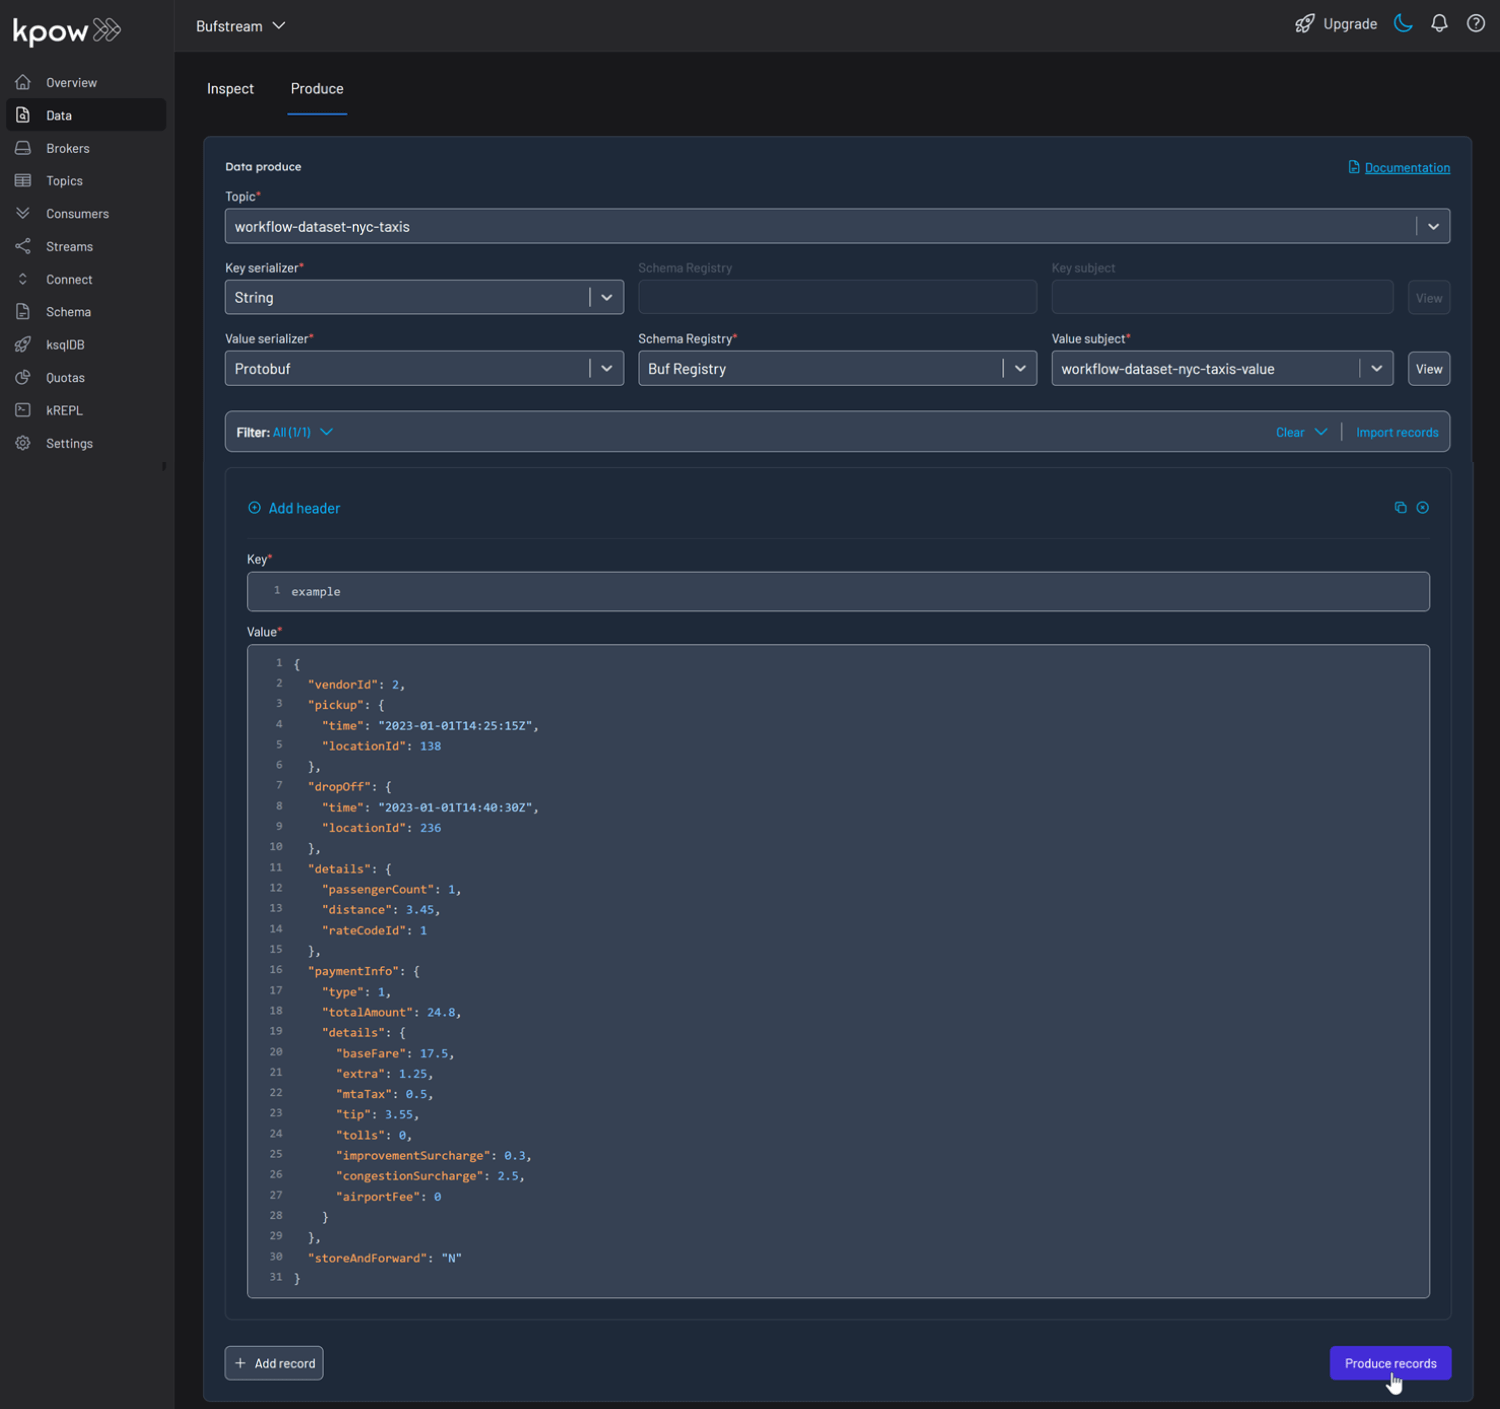
Now, to produce a record to the workflow-dataset-nyc-taxis topic:
- Go to the Data menu, select the topic, and open the Produce tab.
- Set the Key Serializer to
String. - Set the Value Serializer to
Protobuf. - Choose Buf Registry as the Schema Registry.
- Select the
workflow-dataset-nyc-taxis-valuesubject. - Enter your key and a valid JSON value for the message, then click Produce.
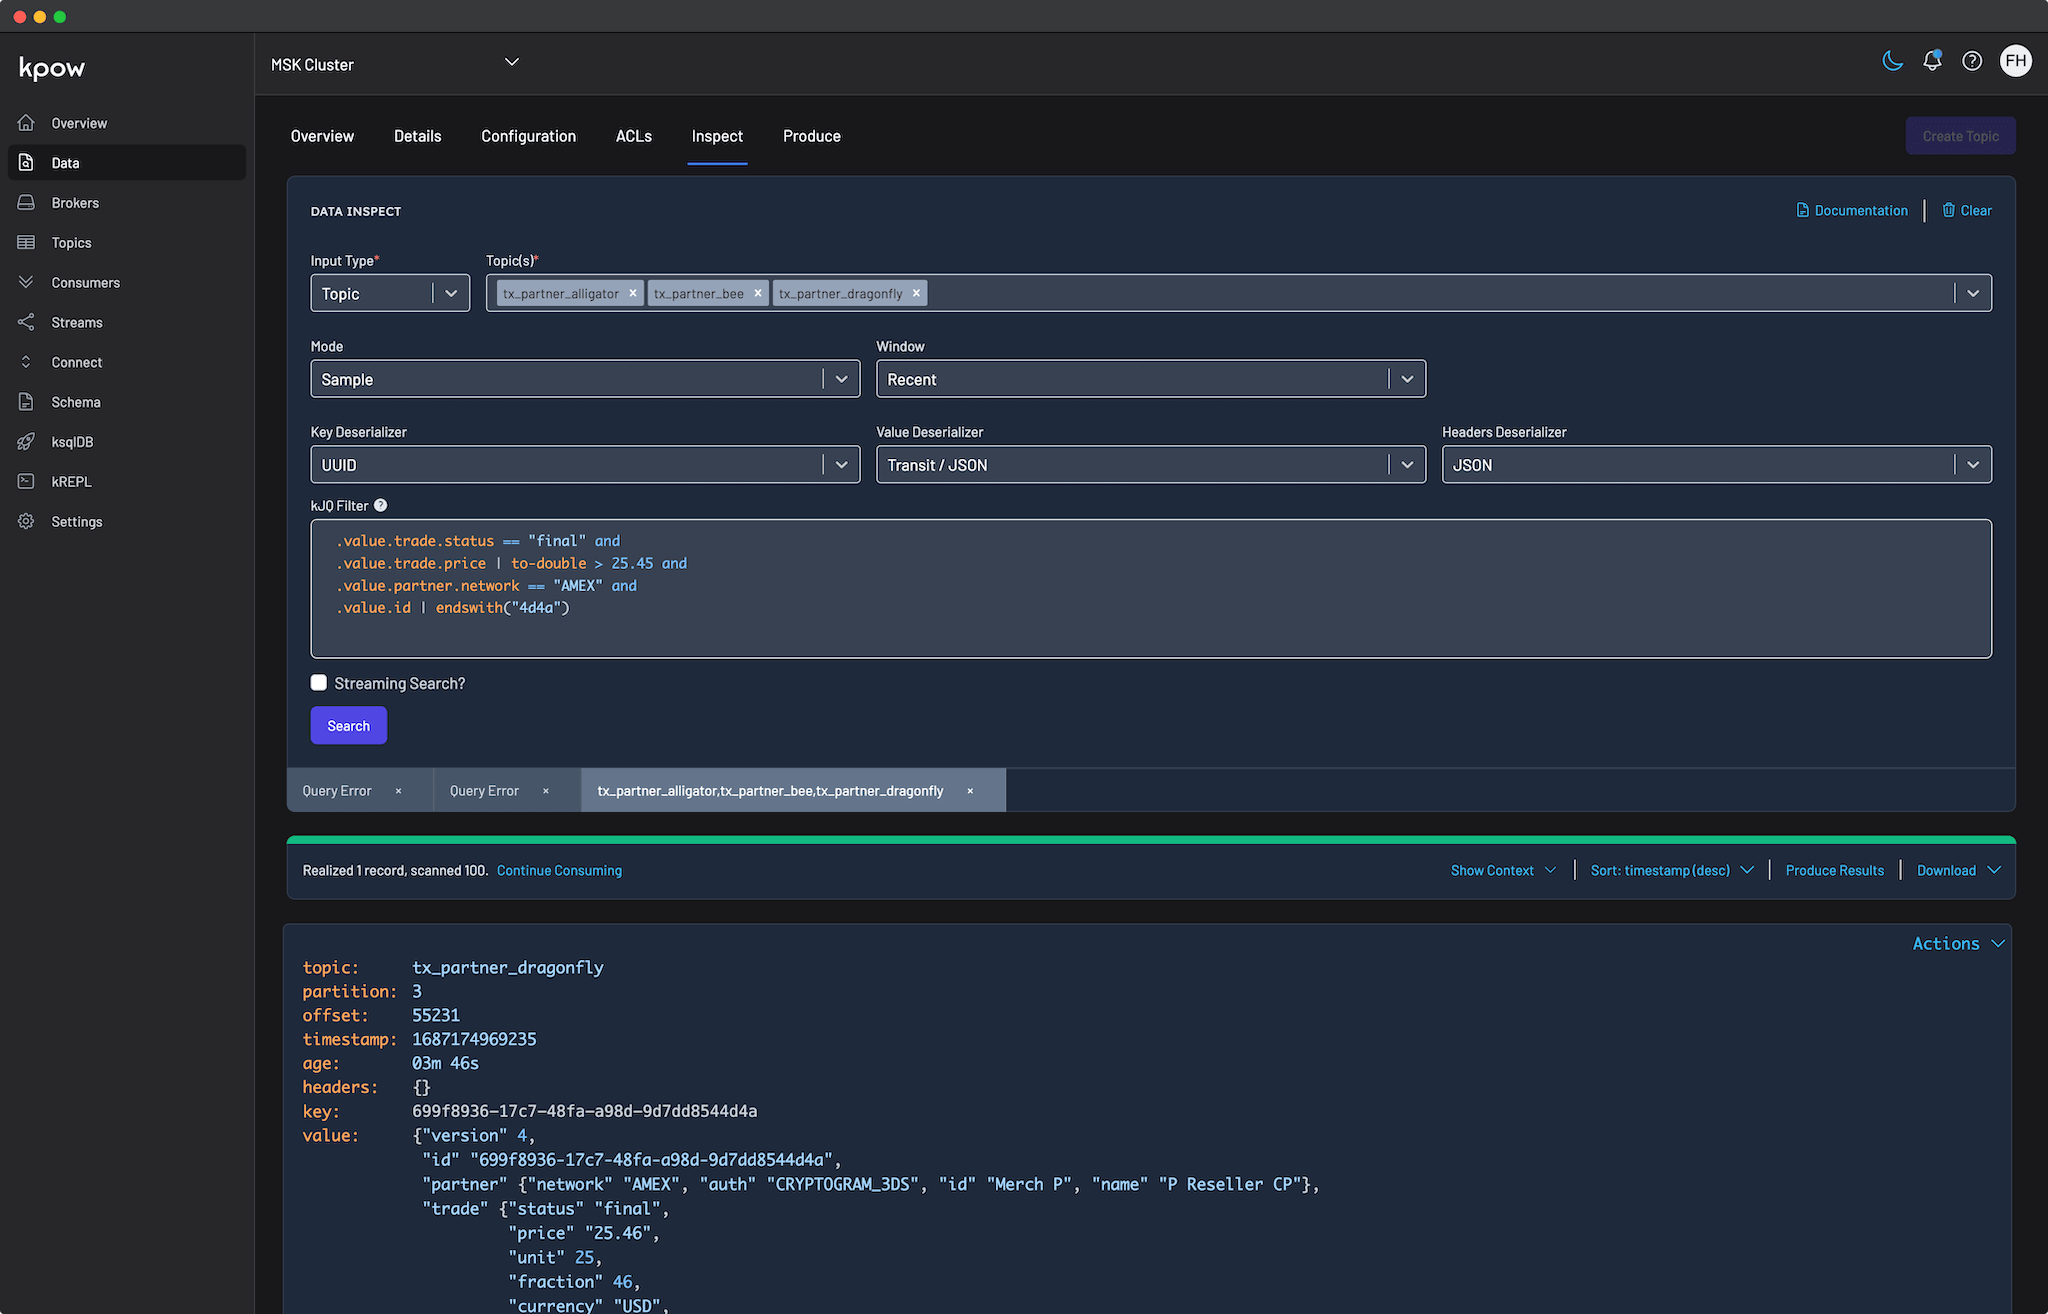
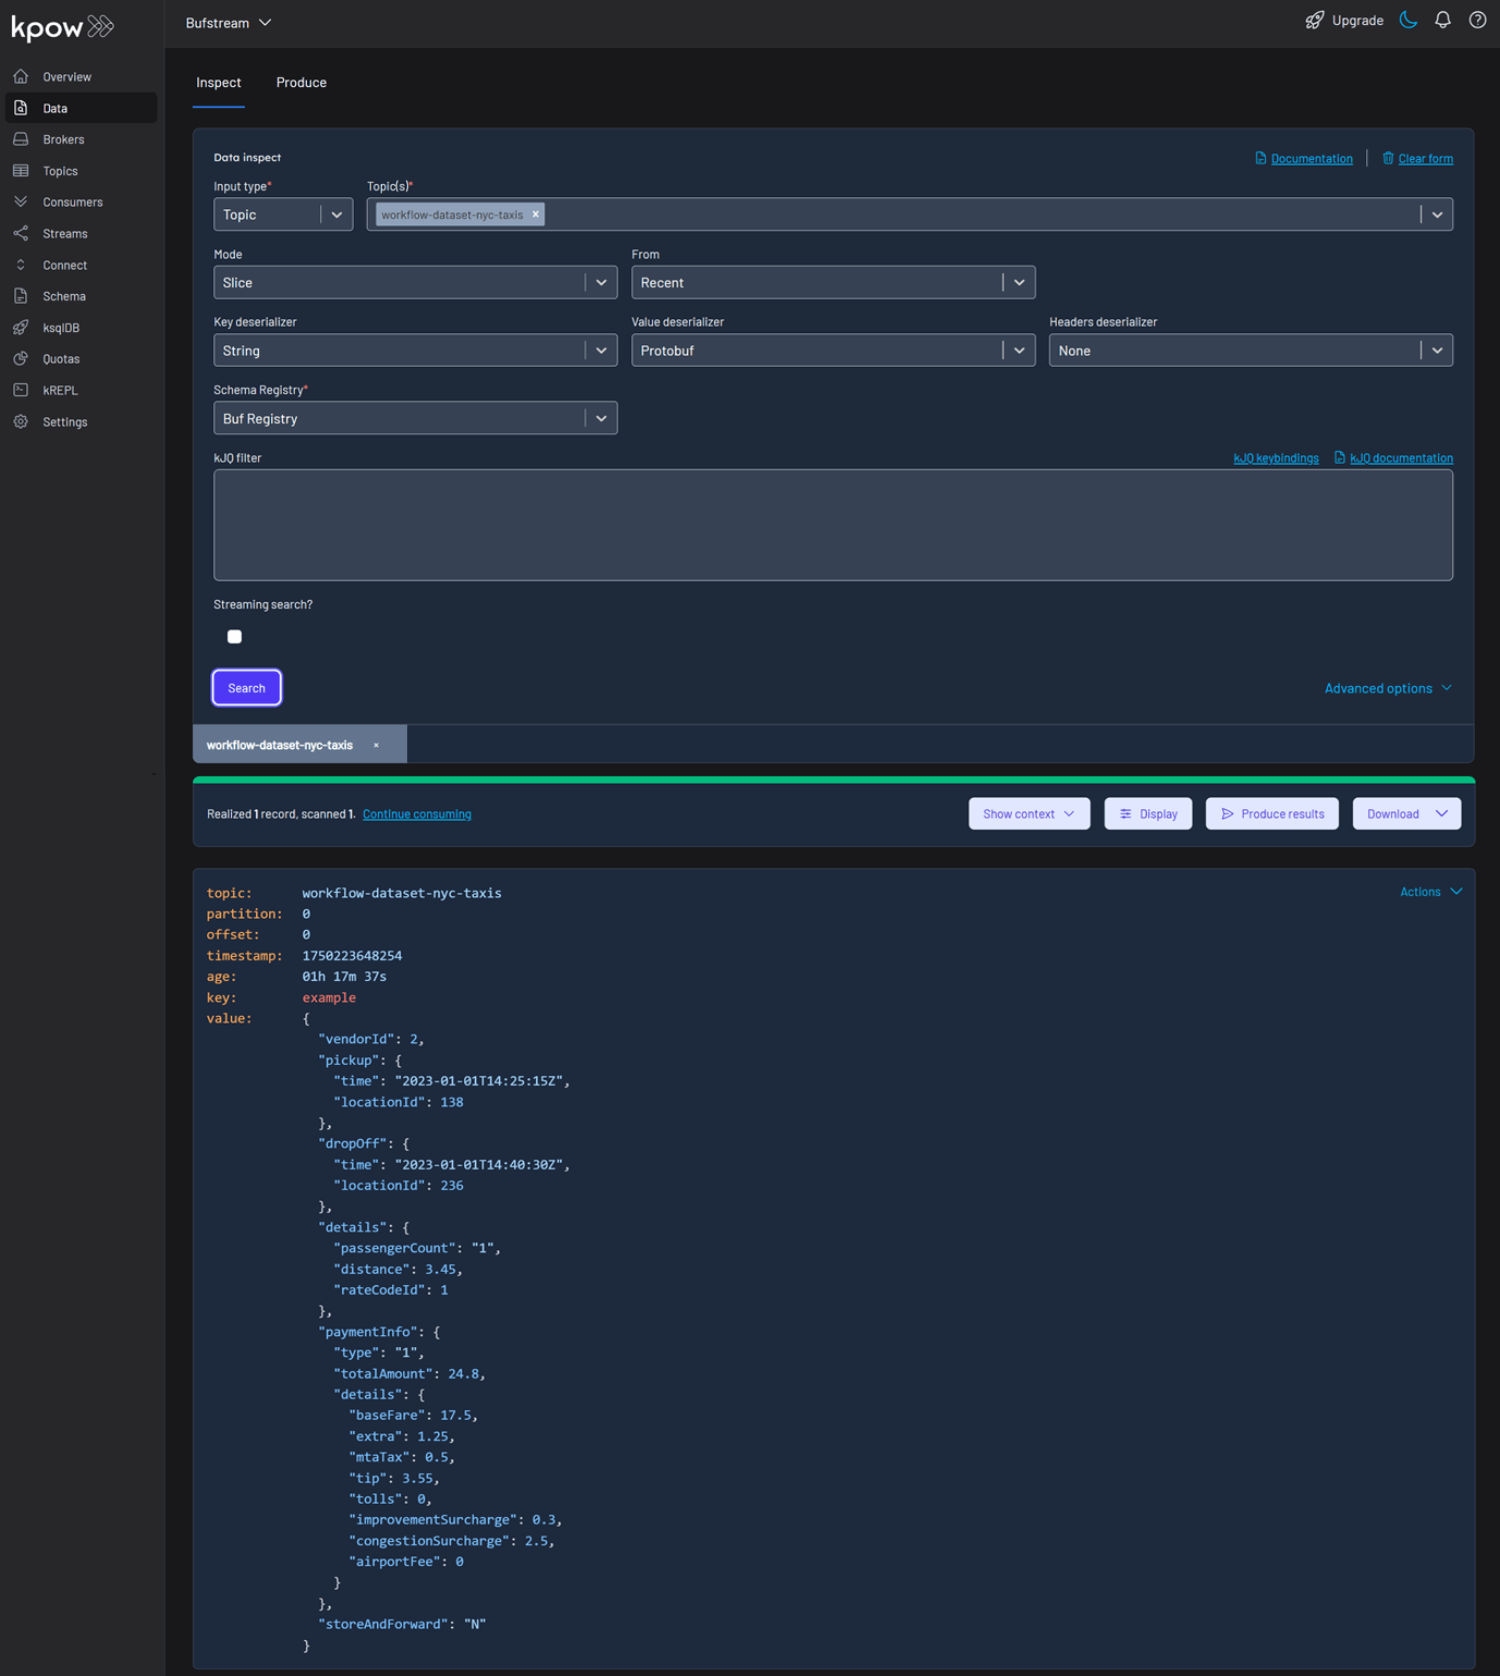
To view the result, navigate to the Data tab and select the workflow-dataset-nyc-taxis topic. In the deserializer options, choose String as the Key deserializer and Protobuf as the Value deserializer, then select Buf Registry. Kpow will automatically fetch the correct schema version, deserialize the Protobuf message, and display the data as readable JSON.
Shutdown Environment
The Docker containers and network can be removed using the commands below.
docker rm -f bufstream kpow
docker network rm factorhouse
Conclusion
In this guide, we demonstrated how to integrate Bufstream with Kpow. We launched the services using Docker, connected Kpow to Buf's public Schema Registry, and explored a real-world Protobuf schema. Most importantly, we demonstrated how Kpow's UI simplifies the process of producing and consuming schema-validated Protobuf messages, providing immediate feedback and making data inspection effortless. This setup provides a powerful and streamlined workflow, significantly improving the development experience for any schema-driven application on Kafka.