Overview
This guide provides a comprehensive walkthrough for deploying Kpow, a powerful toolkit for Apache Kafka, onto an Amazon EKS (Elastic Kubernetes Service) cluster. We will cover the entire process from start to finish, including provisioning the necessary AWS infrastructure, deploying a Kafka cluster using the Strimzi operator, and finally, installing Kpow using a subscription from the AWS Marketplace.
The guide demonstrates how to set up both Kpow Annual and Kpow Hourly products, highlighting the specific integration points with AWS services like IAM for service accounts, ECR for container images, and the AWS License Manager for the annual subscription. By the end of this tutorial, you will have a fully functional environment running Kpow on EKS, ready to monitor and manage your Kafka cluster.
The source code and configuration files used in this guide can be found in the features/eks-deployment folder of this GitHub repository.
About Factor House
Factor House is a leader in real-time data tooling, empowering engineers with innovative solutions for Apache Kafka® and Apache Flink®.
Our flagship product, Kpow for Apache Kafka, is the market-leading enterprise solution for Kafka management and monitoring.
Explore our live multi-cluster demo environment or grab a free Community license and dive into streaming tech on your laptop with Factor House Local.
Prerequisites
To follow along the guide, you need:
- CLI Tools:
- AWS Infrastructure:
- VPC: A Virtual Private Cloud (VPC) that has both public and private subnets is required.
- IAM Permissions: A user with the necessary IAM permissions to create an EKS cluster with a service account.
- Kpow Subscription:
- A subscription to a Kpow product through the AWS Marketplace is required. After subscribing, you will receive access to the necessary components and deployment instructions.
- The specifics of accessing the container images and Helm chart depend on the chosen Kpow product:
- Kpow Annual product:
- Subscribing to the annual product provides access to the ECR (Elastic Container Registry) image and the corresponding Helm chart.
- Kpow Hourly product:
- For the hourly product, access to the ECR image will be provided and deployment utilizes the public Factor House Helm repository for installation.
- Kpow Annual product:
Deploy an EKS cluster
We will use eksctl to provision an Amazon EKS cluster. The configuration for the cluster is defined in the manifests/eks/cluster.eksctl.yaml file within the repository.
Before creating the cluster, you must open this file and replace the placeholder values for <VPC-ID>, <PRIVATE-SUBNET-ID-* >, and <PUBLIC-SUBNET-ID-* > with your actual VPC and subnet IDs.
⚠️ The provided configuration assumes the EKS cluster will be deployed in the
us-east-1region. If you intend to use a different region, you must update themetadata.regionfield and ensure the availability zone keys undervpc.subnets(e.g.,us-east-1a,us-east-1b) match the availability zones of the subnets in your chosen region.
Here is the content of the cluster.eksctl.yaml file:
apiVersion: eksctl.io/v1alpha5
kind: ClusterConfig

metadata:
  name: fh-eks-cluster
  region: us-east-1

vpc:
  id: "<VPC-ID>"
  subnets:
    private:
      us-east-1a:
        id: "<PRIVATE-SUBNET-ID-1>"
      us-east-1b:
        id: "<PRIVATE-SUBNET-ID-2>"
    public:
      us-east-1a:
        id: "<PUBLIC-SUBNET-ID-1>"
      us-east-1b:
        id: "<PUBLIC-SUBNET-ID-2>"

iam:
  withOIDC: true
  serviceAccounts:
    - metadata:
        name: kpow-annual
        namespace: factorhouse
      attachPolicyARNs:
        - "arn:aws:iam::aws:policy/service-role/AWSLicenseManagerConsumptionPolicy"
    - metadata:
        name: kpow-hourly
        namespace: factorhouse
      attachPolicyARNs:
        - "arn:aws:iam::aws:policy/AWSMarketplaceMeteringRegisterUsage"

nodeGroups:
  - name: ng-dev
    instanceType: t3.medium
    desiredCapacity: 4
    minSize: 2
    maxSize: 6
    privateNetworking: true
This configuration sets up the following:
- Cluster Metadata: A cluster named
fh-eks-clusterin theus-east-1region. - VPC: Specifies an existing VPC and its public/private subnets where the cluster resources will be deployed.
- IAM with OIDC: Enables the IAM OIDC provider, which allows Kubernetes service accounts to be associated with IAM roles. This is crucial for granting AWS permissions to your pods.
- Service Accounts:
kpow-annual: Creates a service account for the Kpow Annual product. It attaches theAWSLicenseManagerConsumptionPolicy, allowing Kpow to validate its license with the AWS License Manager service.kpow-hourly: Creates a service account for the Kpow Hourly product. It attaches theAWSMarketplaceMeteringRegisterUsagepolicy, which is required for reporting usage metrics to the AWS Marketplace.
- Node Group: Defines a managed node group named
ng-devwitht3.mediuminstances. The worker nodes will be placed in the private subnets (privateNetworking: true).
Once you have updated the YAML file with your networking details, run the following command to create the cluster. This process can take 15-20 minutes to complete.
eksctl create cluster -f cluster.eksctl.yaml
Once the cluster is created, eksctl automatically updates your kubeconfig file (usually located at ~/.kube/config) with the new cluster's connection details. This allows you to start interacting with your cluster immediately using kubectl.
kubectl get nodes
# NAME                              STATUS   ROLES    AGE     VERSION
# ip-192-168-...-21.ec2.internal   Ready    <none>   2m15s    v1.32.9-eks-113cf36
# ...
Launch a Kafka cluster
With the EKS cluster running, we will now launch an Apache Kafka cluster into it. We will use the Strimzi Kafka operator, which simplifies the process of running Kafka on Kubernetes.
Install the Strimzi operator
First, create a dedicated namespace for the Kafka cluster.
kubectl create namespace kafka
Next, download the Strimzi operator installation YAML. The repository already contains the file manifests/kafka/strimzi-cluster-operator-0.45.1.yaml, but the following commands show how it was downloaded and modified for this guide.
## Define the Strimzi version and download URL
STRIMZI_VERSION="0.45.1"
DOWNLOAD_URL=https://github.com/strimzi/strimzi-kafka-operator/releases/download/$STRIMZI_VERSION/strimzi-cluster-operator-$STRIMZI_VERSION.yaml

## Download the operator manifest
curl -L -o manifests/kafka/strimzi-cluster-operator-$STRIMZI_VERSION.yaml ${DOWNLOAD_URL}

## Modify the manifest to install the operator in the 'kafka' namespace
sed -i 's/namespace: .*/namespace: kafka/' manifests/kafka/strimzi-cluster-operator-$STRIMZI_VERSION.yaml
Now, apply the manifest to install the Strimzi operator in your EKS cluster.
kubectl apply -f manifests/kafka/strimzi-cluster-operator-0.45.1.yaml -n kafka
Deploy a Kafka cluster
The configuration for our Kafka cluster is defined in manifests/kafka/kafka-cluster.yaml. It describes a simple, single-node cluster suitable for development, using ephemeral storage, meaning data will be lost if the pods restart.
apiVersion: kafka.strimzi.io/v1beta2
kind: Kafka
metadata:
  name: fh-k8s-cluster
spec:
  kafka:
    version: 3.9.1
    replicas: 1
    listeners:
      - name: plain
        port: 9092
        type: internal
        tls: false
# ... (content truncated for brevity)
Deploy the Kafka cluster with the following command:
kubectl create -f manifests/kafka/kafka-cluster.yaml -n kafka
Verify the deployment
After a few minutes, all the necessary pods and services for Kafka will be running. You can verify this by listing all resources in the kafka namespace.
kubectl get all -n kafka -o name
The output should look similar to this, showing the pods for Strimzi, Kafka, Zookeeper, and the associated services. The most important service for connecting applications is the Kafka bootstrap service.
# pod/fh-k8s-cluster-entity-operator-...
# pod/fh-k8s-cluster-kafka-0
# ...
# service/fh-k8s-cluster-kafka-bootstrap <-- Kafka bootstrap service
# ...
Deploy Kpow
Now that the EKS and Kafka clusters are running, we can deploy Kpow. This guide covers the deployment of both Kpow Annual and Kpow Hourly products. Both deployments will use a common set of configurations for connecting to Kafka and setting up authentication/authorization.
First, ensure you have a namespace for Kpow. The eksctl command we ran earlier already created the service accounts in the factorhouse namespace, so we will use that. If you hadn't created it, you would run kubectl create namespace factorhouse.
Create ConfigMaps
We will use two Kubernetes ConfigMaps to manage Kpow's configuration. This approach separates the core configuration from the Helm deployment values.
kpow-config-files: This ConfigMap holds file-based configurations, including RBAC policies, JAAS configuration, and user properties for authentication.kpow-config: This ConfigMap provides environment variables to the Kpow container, such as the Kafka bootstrap address and settings to enable our authentication provider.
The contents of these files can be found in the repository at manifests/kpow/config-files.yaml and manifests/kpow/config.yaml.
manifests/kpow/config-files.yaml
apiVersion: v1
kind: ConfigMap
metadata:
  name: kpow-config-files
  namespace: factorhouse
data:
  hash-rbac.yml: |
    # RBAC policies defining user roles and permissions
    admin_roles:
      - "kafka-admins"
    # ... (content truncated for brevity)
  hash-jaas.conf: |
    # JAAS login module configuration
    kpow {
      org.eclipse.jetty.jaas.spi.PropertyFileLoginModule required
      file="/etc/kpow/jaas/hash-realm.properties";
    };
    # ... (content truncated for brevity)
  hash-realm.properties: |
    # User credentials (username: password, roles)
    # admin/admin
    admin: CRYPT:adpexzg3FUZAk,server-administrators,content-administrators,kafka-admins
    # user/password
    user: password,kafka-users
    # ... (content truncated for brevity)
manifests/kpow/config.yaml
apiVersion: v1
kind: ConfigMap
metadata:
  name: kpow-config
  namespace: factorhouse
data:
  # Environment Configuration
  BOOTSTRAP: "fh-k8s-cluster-kafka-bootstrap.kafka.svc.cluster.local:9092"
  REPLICATION_FACTOR: "1"
  # AuthN + AuthZ
  JAVA_TOOL_OPTIONS: "-Djava.awt.headless=true -Djava.security.auth.login.config=/etc/kpow/jaas/hash-jaas.conf"
  AUTH_PROVIDER_TYPE: "jetty"
  RBAC_CONFIGURATION_FILE: "/etc/kpow/rbac/hash-rbac.yml"
Apply these manifests to create the ConfigMaps in the factorhouse namespace.
kubectl apply -f manifests/kpow/config-files.yaml \
  -f manifests/kpow/config.yaml -n factorhouse
You can verify their creation by running:
kubectl get configmap -n factorhouse
# NAME                DATA   AGE
# kpow-config         5      ...
# kpow-config-files   3      ...
Deploy Kpow Annual
Download the Helm chart
The Helm chart for Kpow Annual is in a private Amazon ECR repository. First, authenticate your Helm client.
# Enable Helm's experimental support for OCI registries
export HELM_EXPERIMENTAL_OCI=1

# Log in to the AWS Marketplace ECR registry
aws ecr get-login-password \
    --region us-east-1 | helm registry login \
    --username AWS \
    --password-stdin 709825985650.dkr.ecr.us-east-1.amazonaws.com
Next, pull and extract the chart.
# Create a directory, pull the chart, and extract it
mkdir -p awsmp-chart && cd awsmp-chart
# Pull the latest version of the Helm chart from ECR (add --version <x.x.x> to specify a version)
helm pull oci://709825985650.dkr.ecr.us-east-1.amazonaws.com/factor-house/kpow-aws-annual
tar xf $(pwd)/* && find $(pwd) -maxdepth 1 -type f -delete
cd ..
Launch Kpow Annual
Now, install Kpow using Helm. We will reference the service account kpow-annual that was created during the EKS cluster setup, which has the required IAM policy for license management.
helm install kpow-annual ./awsmp-chart/kpow-aws-annual/ \
    -n factorhouse \
    --set serviceAccount.create=false \
    --set serviceAccount.name=kpow-annual \
    --values ./values/eks-annual.yaml
The Helm values for this deployment are in values/eks-annual.yaml. It mounts the configuration files from our ConfigMaps and sets resource limits.
# values/eks-annual.yaml
env:
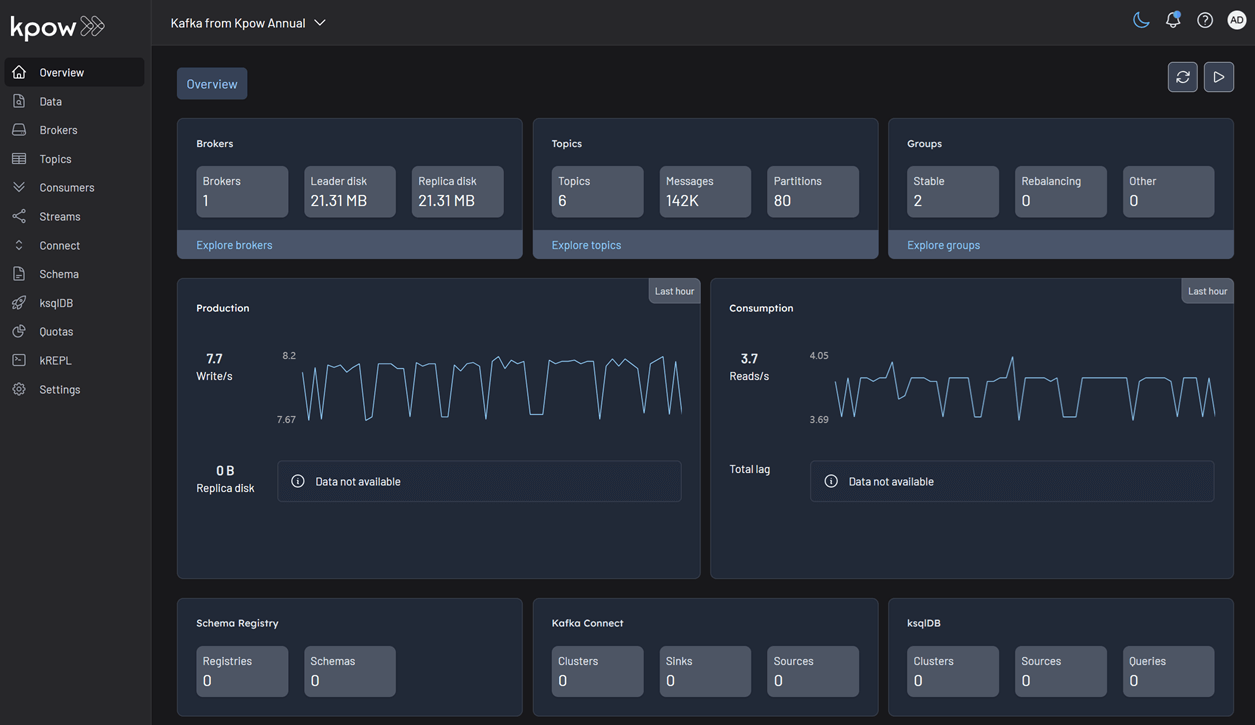
ENVIRONMENT_NAME: "Kafka from Kpow Annual"
envFromConfigMap: "kpow-config"
volumeMounts:
- name: kpow-config-volumes
mountPath: /etc/kpow/rbac/hash-rbac.yml
subPath: hash-rbac.yml
- name: kpow-config-volumes
mountPath: /etc/kpow/jaas/hash-jaas.conf
subPath: hash-jaas.conf
- name: kpow-config-volumes
mountPath: /etc/kpow/jaas/hash-realm.properties
subPath: hash-realm.properties
volumes:
- name: kpow-config-volumes
configMap:
name: "kpow-config-files"
resources:
limits:
cpu: 1
memory: 0.5Gi
requests:
cpu: 1
memory: 0.5Gi
Note: The CPU and memory values are intentionally set low for this guide. For production environments, check the official documentation for recommended capacity.
Verify and access Kpow Annual
Check that the Kpow pod is running successfully.
kubectl get all -l app.kubernetes.io/instance=kpow-annual -n factorhouse
# NAME                                              READY   STATUS    RESTARTS   AGE
# pod/kpow-annual-kpow-aws-annual-c6bc849fb-zw5ww   0/1     Running   0          46s

# NAME                                  TYPE        CLUSTER-IP       EXTERNAL-IP   PORT(S)    AGE
# service/kpow-annual-kpow-aws-annual   ClusterIP   10.100.220.114   <none>        3000/TCP   47s
# ...
To access the UI, forward the service port to your local machine.
kubectl -n factorhouse port-forward service/kpow-annual-kpow-aws-annual 3000:3000
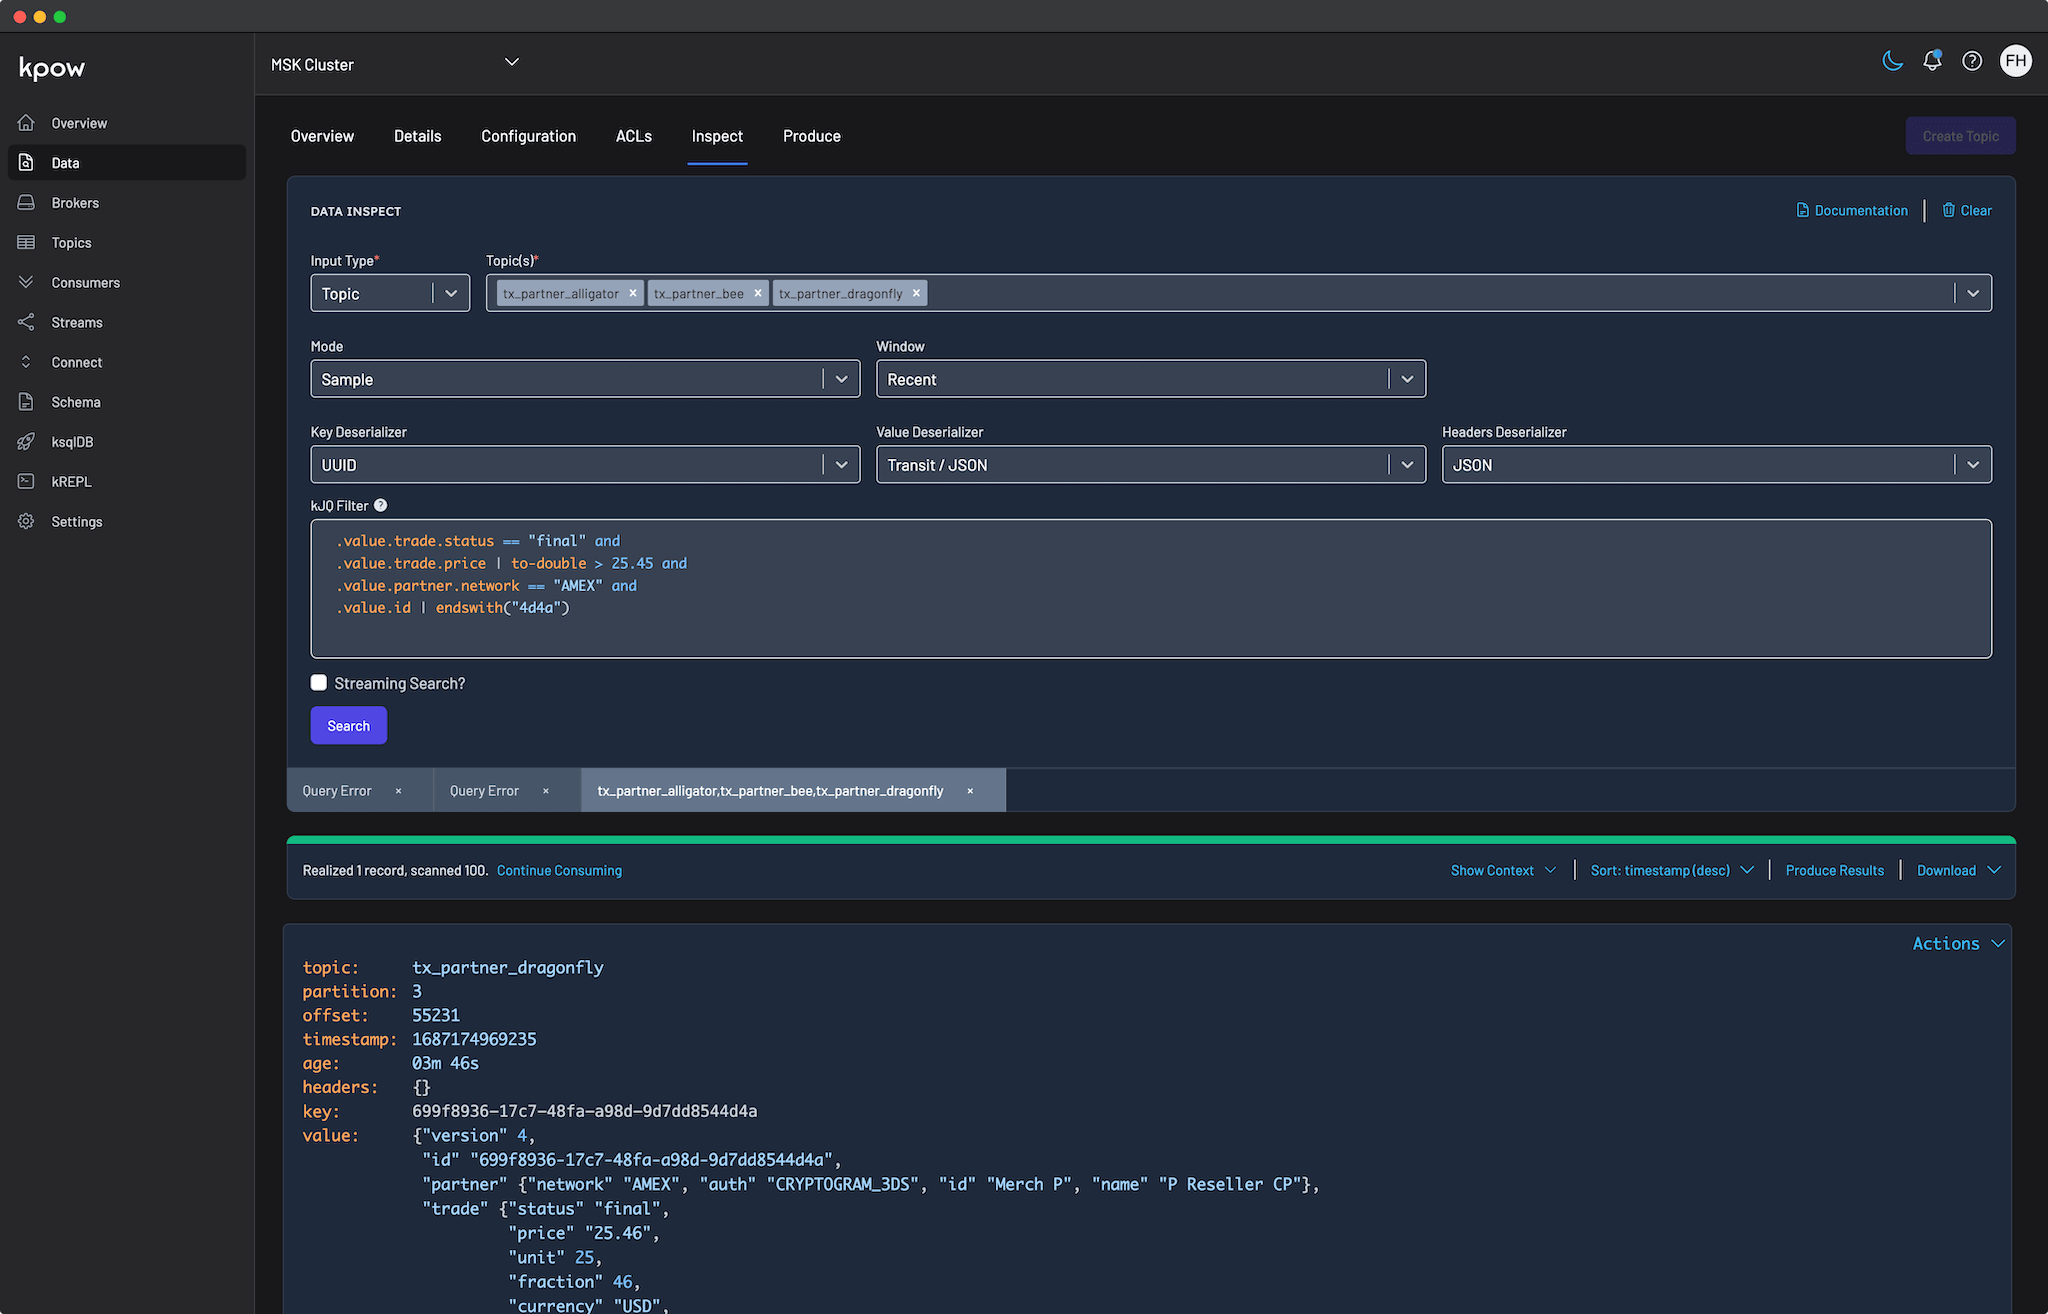
You can now access Kpow by navigating to http://localhost:3000 in your browser.
Deploy Kpow Hourly
Configure the Kpow Helm repository
The Helm chart for Kpow Hourly is available in the Factor House Helm repository. First, add the Helm repository.
helm repo add factorhouse https://charts.factorhouse.io
Next, update Helm repositories to ensure you install the latest version of Kpow.
helm repo update
Launch Kpow Hourly
Install Kpow using Helm, referencing the kpow-hourly service account which has the IAM policy for marketplace metering.
helm install kpow-hourly factorhouse/kpow-aws-hourly \
  -n factorhouse \
  --set serviceAccount.create=false \
  --set serviceAccount.name=kpow-hourly \
  --values ./values/eks-hourly.yaml
The Helm values are defined in values/eks-hourly.yaml.
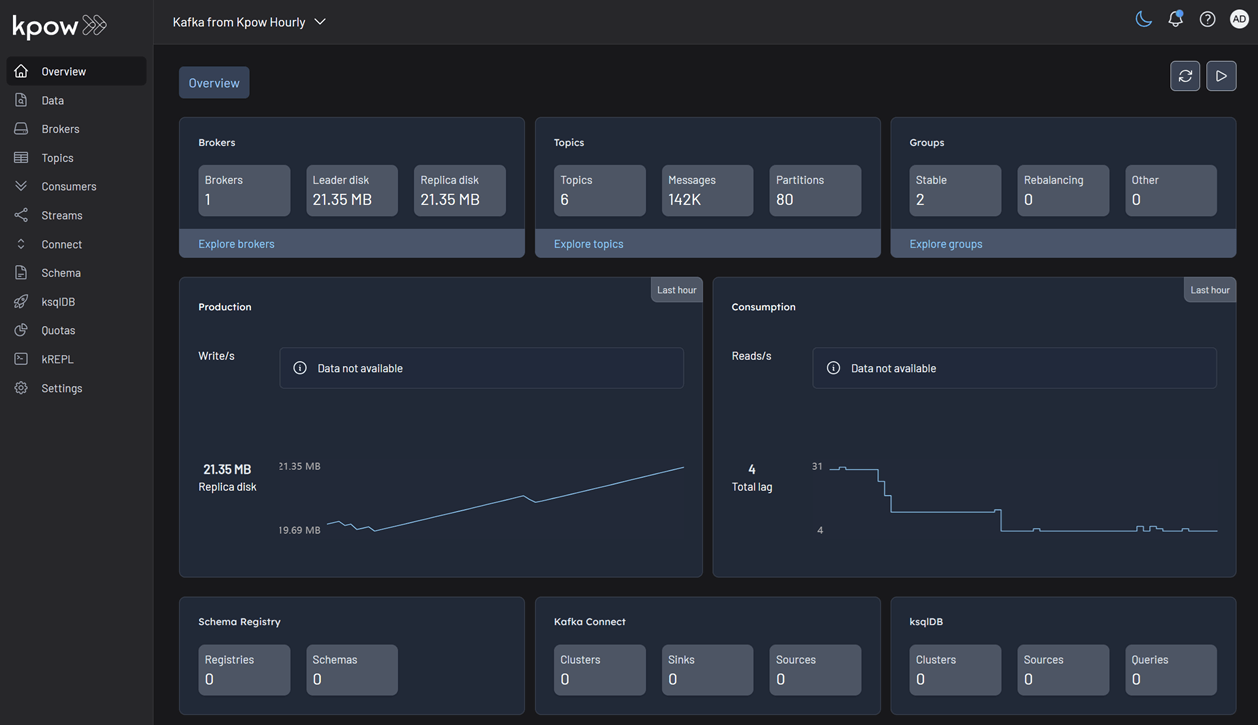
# values/eks-hourly.yaml
env:
  ENVIRONMENT_NAME: "Kafka from Kpow Hourly"
envFromConfigMap: "kpow-config"
volumeMounts:
# ... (volume configuration is the same as annual)
volumes:
# ...
resources:
# ...
Verify and access Kpow Hourly
Check that the Kpow pod is running.
kubectl get all -l app.kubernetes.io/instance=kpow-hourly -n factorhouse
# NAME                                               READY   STATUS    RESTARTS   AGE
# pod/kpow-hourly-kpow-aws-hourly-68869b6cb9-x9prf   0/1     Running   0          83s

# NAME                                  TYPE        CLUSTER-IP      EXTERNAL-IP   PORT(S)    AGE
# service/kpow-hourly-kpow-aws-hourly   ClusterIP   10.100.221.36   <none>        3000/TCP   85s
# ...
To access the UI, forward the service port to a different local port (e.g., 3001) to avoid conflicts.
kubectl -n factorhouse port-forward service/kpow-hourly-kpow-aws-hourly 3001:3000
You can now access Kpow by navigating to http://localhost:3001 in your browser.
Delete resources
To avoid ongoing AWS charges, clean up all created resources in reverse order.
Delete Kpow and ConfigMaps
helm uninstall kpow-annual kpow-hourly -n factorhouse
kubectl delete -f manifests/kpow/config-files.yaml \
  -f manifests/kpow/config.yaml -n factorhouse
Delete the Kafka cluster and Strimzi operator
STRIMZI_VERSION="0.45.1"
kubectl delete -f manifests/kafka/kafka-cluster.yaml -n kafka
kubectl delete -f manifests/kafka/strimzi-cluster-operator-$STRIMZI_VERSION.yaml -n kafka
Delete the EKS cluster
This command will remove the cluster and all associated resources.
eksctl delete cluster -f manifests/eks/cluster.eksctl.yaml
Conclusion
In this guide, we have successfully deployed a complete, production-ready environment for monitoring Apache Kafka on AWS. By leveraging eksctl, we provisioned a robust EKS cluster with correctly configured IAM roles for service accounts, a critical step for secure integration with AWS services. We then deployed a Kafka cluster using the Strimzi operator, demonstrating the power of Kubernetes operators in simplifying complex stateful applications.
Finally, we walked through the deployment of both Kpow Annual and Kpow Hourly from the AWS Marketplace. This showcased the flexibility of Kpow's subscription models and their seamless integration with AWS for licensing and metering. You are now equipped with the knowledge to set up, configure, and manage Kpow on EKS, unlocking powerful insights and operational control over your Kafka ecosystem.